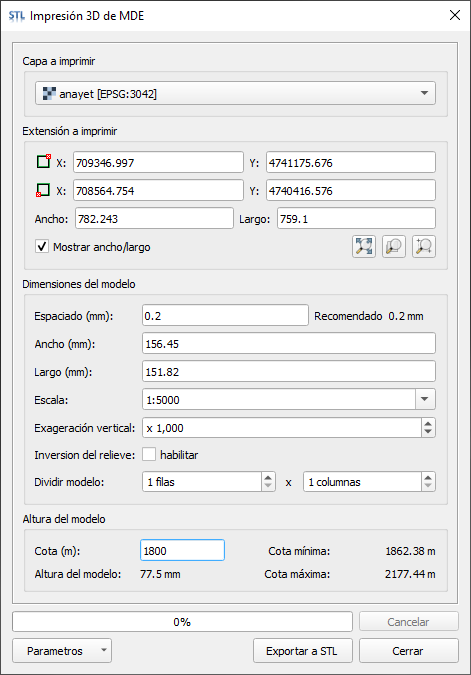
DEMto3D extension allows you to export DEM to STL format for 3D printing. The model is built through the definition of parameters. The main window of DEMto3D looks like.
The following will describe the different parameters for defining a 3D model:
Layer to print
This section selects the layer that contains the elevation data that you want to print. Through a pulldown menu, showing all the visible raster layers loaded, one of them is selected.
Printable extension
This section defines the region, within the boundaries of the selected layer, to be printed. The region has to be rectangular and is defined by its lower left corner and upper right corner. The values that support these fields are the coordinates in the reference system used. You can also define the extent through a point, the width and length of the area. The user should note that the defined extent must be within the extent of the selected layer to print.
In addition, this section contains three options to define the extension through:
- The total extent of the selected layer.
- The extent of a different layer.
- The extent drawn on the canvas.
Model dimensions
In this section we define the dimensions and spacing that define the geometry of the model to be printed. The dimensions are input in millimeters across the width, the highest or the final scale of the model. Entering a value, the other two are automatically calculated.
The spacing corresponds to the separation of the mesh of points that define the model. It is recommended to use a minimum value of 0,2 mm, the bigger is the spacing the more generalized will be the model and less details will be represented.
Vertical exaggeration
The vertical exaggeration factor of the terrain modifies the vertical scale of the model, that is to say exaggerates or softens the features of the terrain. It is simply a factor that multiplies the elevation of the points that form the model, increasing or decreasing its height.
Investment the land
This option consists of reversing the altitude of the points that make up the model. The lowest points will become the highest, print to the upper layers, and the highest will be printed in the lowest layers.
Split the model
Last, there is the option to divide the model equally. Divisions can be defined both horizontally and vertically.
Model base dimension
This option allows you to select the level from which the model will be printed. It is useful in models where we want to remove a portion of land below that base level. By default, all models have a base 2 mm on which the model is based to represent elevation data 0 and null data . Next this option, maximum and minimum dimension of the region of interest are showed, besides the final height the model will has.
Parameters
Through these options, defined parameters can be exported to a file, to be imported later.
Export to STL format
Once all the parameters defining the model are set, through the button “export to STL”, DEMto3D will build the 3D model and export it to STL format in binary.